Friday, April 15, 2016

The Game Room


It has been a while since I have posted.  A lot of people have been asking if I am still working on the drug store.  Yes, I have been doing projects here and there, but I just haven't talked about it.  The project that I most recently worked on is a touchy subject.

Back in January 2016 was the right time for me to move on down to the actual "drug store" portion of the renovation... which is a touchy subject because this portion of the building is near and dear to many, many people in town.  This is the part of the building that hundreds of people have came in and out and made it personal to them.  So for me to write about changing the appearance of this beloved space, I needed to make sure that I emphasized how meaningful this space was to so many people.

Even though this post will only be about the back half of the drug store, this area was one of the most fun parts of the building.  In the early 2000's this building was a children's ministry.  The owners would open every Friday and Saturday and allow any of the children to come in free of charge and receive a hot meal, play games, sing songs, and be part of a positive environment where they could just be kids.

The owners loved these kids and encouraged them to make the building feel like it was "theirs".  So, when the children asked if they could help paint it in a fun way, they did.  It was wild and a bit crazy, but it was their space.

Part of me felt really sad covering up their precious paintings but I remembered that the children who left their mark on this building are not children anymore, they are grown and have moved on. It was very hard to cover up the evidence of their presence and the memories that were still here, but I had to.

Time moves on, and so did they. They will forever hold this piece of history in their hearts and will always remember how wonderful it was for them back then. Now, it was time to reinvent this space and make it into something else for future generations.

The painting process took me a long time.  It took a lot of paint, I mean A LOT of paint.  Not only did it need to painted, but decluttered as well.   This space may not perfect, and maybe not improved to some.... but what I can say for sure, is that it has changed.

This is the game room....

Side by Side Comparisons

                            Before                                                             After


Wednesday, November 11, 2015

Broken Down Bathroom

 Broken Down Bathroom

On my journey to refurbish this one hundred year old building, it was refreshing to have a project that would not take too much work to spruce up.  Whenever I envision fixing up a home, I usually think that the bathrooms need the most work, but that was not the case this time.  The gorgeous antique tile was in excellent condition, and aside from the vanity, the bathroom was really great.  The colors of the tile were fairly neutral and the floor tile was grey and beige!  (Very neutral for the time period!)  All this room needed was some paint, a new vanity and a good cleaning.  Easy fixes!


New paint color.  The walls, ceiling, and trim used to be beige.  Now the ceiling is my favorite Antique Lace White, and the walls are in a soft cream.  All of the wood trim was painted to match the accents in the tile, Moroccan Brown.


Here is the bathroom after I painted, and before I replaced the vanity.

The 1930's style pink bathtub was not in bad shape!
(I kind-of like it's charm.)


I didn't even need to re-do any of the grout... no mold, no broken tiles!


 The new vanity is beautiful!  Even though this piece is very contemporary I think it fits in great with the rest of the room.


Finished product (For now)

Total cost of this renovation: $200

Paint: $75
Vanity: $100
Decor: $25


Sunday, October 11, 2015

Maximizing a Miniature Porch


It has been a while since I have posted to my blog, but you didn't miss much.  Over the summer, renovations slowed to a near halt!  After a deer collided with my car, most of the money I had saved to do summer renovations had to be redirected to fix my car...  And with a vacation in July, teaching summer school, and coaching my cheer squad, I didn't get too much done.

I thought for sure that once I was on break for the summer I would really get a lot of things done, but it was quite the opposite!  Now that I am back to school, I have started tackling projects again.  One thing that I have recently finished is my upstairs porch.


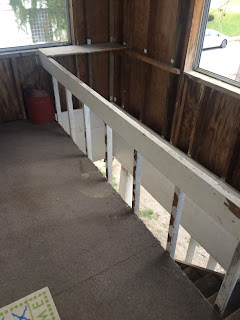
It started out as a very unsafe and ugly sight!  The railing had been kicked off of the stairs and needed to be rebuilt.  Thanks to my handy husband, the railing was rebuilt sturdier than before, and safe to use.

The walls of the top of the porch had never been finished.  They were dark and felt very cave-like.


All three windows had been broken out!


The original door had been kicked in, but my handy husband replaced it with this one.  It is not new, fancy, or gorgeous... but it was free, and in my budget free is my favorite! (Thanks, Dad for the freebie!)


One of the weirdest things about rebuilding the railing was that half of the posts were missing... I still have no idea why someone would take those? (Sidenote: We will be replacing the missing ones as soon as we find the right replacements)

It took me a couple weeks to finish this project.  I worked on it for only a couple hours each day.  Now that I am back at school, I only have a few hours of daylight.  Perseverance pays off though.

Here is the finished product:

Using items that I found all around the building, I was able to maximize space in this tiny porch.  Now, it is one of my most favorite spots!

The first thing I did was paint all of the dark wood using an antique shade of white.  This took days!!!  Each nook and cranny seemed to soak up the paint and it took three coats to go from dark brown to a fresh white.

Thankfully I did not have to do this alone.  One of the best things about this renovation is that some of the local kids have taken interest in helping me and a sweet girl who lives down the street helped me all the way until it was finished.


No more broken glass!  All three of the windows have been repaired.

Now that the windows are functional, I felt it was necessary to dress them up with outdoor curtains.  Softening the edges of the windows made this porch feel warm and cozy.  Perfect to sit outside and watch the setting sun with a warm cup of tea.


Remember the exterior door?  I happen to find a great storm door at "Habitat for Humanity".  Lucky me!  Behind the exterior door is a very large hallway that does not have any windows.  Now, this storm door allows for flooding light to fill the hallway!


Here's a cute little owl I found.  She looks perfect with that little pumpkin.  The shelf that they are sitting on was one of the pieces left behind.  I think that originally this shelf was wider, but like the railing... some of it is missing.


How cute are these chairs!  I found these chairs downstairs in the drug store.  I choose these two because they were small enough to sit on the porch without obstructing the walkway.  They had been painted in these fun colors from when the building was a children's ministry.  When I started to sand them, I found the white underneath.  I was going to paint them a solid, matching color, but stopped once I saw how cute they were just like this.


So here is how the budget broke down:

Paint- $50
New window panes- $80
Curtains- $48
Storm Door- $75
Exterior Door- $0
Two Antique Chairs- $0
Misc. Decor- $0


Total- $253


Monday, May 25, 2015

Airing Out A Dirty Laundry (Room)

Airing Out A Dirty Laundry (Room)


Over the last 9 years of our marriage, my husband and I have moved a few times.  We've had some fairly nice (tiny) apartments and most recently, lived in a sweet little farm house.  However, this is my first time EVER having an actual laundry room!  It really was exciting to have a designated room where I could just shut the door and guests didn't have to see all my dirty laundry!

To get an inspiration I went to my favorite place to get paint, Sherwin Williams. I know, a lot of people think that getting paint from the big box stores is the cheapest route to go, but I have found that cheap paint means you'll need to paint again in a very short time frame.  Every time I have purchased paint from Sherwin Williams, it has always been exceptional paint, scrubbable, and can make any room look great.

I choose "Honest Blue" for the wall color, and picked out a beautiful large floral print wallpaper for a focus wall.  I would have loved to do more than one wall with this awesome wallpaper, but as I said before, I am a teacher and have a teacher's budget!


The accessories that I used to decorate were mostly freebies.  The mirror was given to me from my aunt.  It was gold, but I dry-brushed it the same white as the trim.  The blue hat rack on the wall is a special little piece I got from a local antique shop.  It is made out of a plank of bead board.  The rest of my accessories were things that I had around the house.  They were are just given a new home in this wonderful room.


Many of you don't know this, but my laundry room also doubles as my closet.  Renovations have yet to begin on the master bedroom so I needed a space to put my clothes.  I designed this room with the intentions that when it is no longer needed as a closet space, it will be an exceptional storage place.

This room is a spacious 8 feet by 10 feet with a large window that lets in the morning sun.  I kept the washer/dryer water lines and venting in the same location to cut down on restoration costs, had a professional roofer repair the leak that caused the ceiling to fall, and then replaced the ceiling tiles that had fallen with new ones.


All of the moldings needed paint.  The trim at the top was dark brown, so I painted them white to coordinate with the baseboard moldings.

My husband helped me install an 8 foot long wire closet shelf and TADA! A fresh and beautiful laundry room!

Total cost of this laundry room renovation:  $115
(Cost of the roofer was not included in this price)


Side by Side of the before and after


Wednesday, May 20, 2015

The Boys Room


Of all the rooms in this 100 year old building, the second bedroom needed the least amount of work.   This 10x16 room with a walk-in closet had more than three layers of peeling paint over three layers of peeling wallpaper!  So when scraping didn't cut it, my husband and I started steaming.  We steamed for two days before coming to the conclusion that our 12" steamer was going to take and whole week to finish the job.  That is when my husband got creative! Below is the contraption that he came up with:


This is a plastic bin from the dollar store that had a hole drilled in the center for the steam to enter the chamber, making it possible for us to do about 4 square feet at a time.


Pictured above is my brother-in-law volunteering to help steam. 

After a lot of steaming, painting, and polishing the wood floors, the results are stunning!


The walls are painted a clean linen blue, with an antique white ceiling.  The floors are the original color.


 Our boys LOVE superheroes, so I stole this idea from Pinterest.


IKEA storage solutions


Shining wood floors!